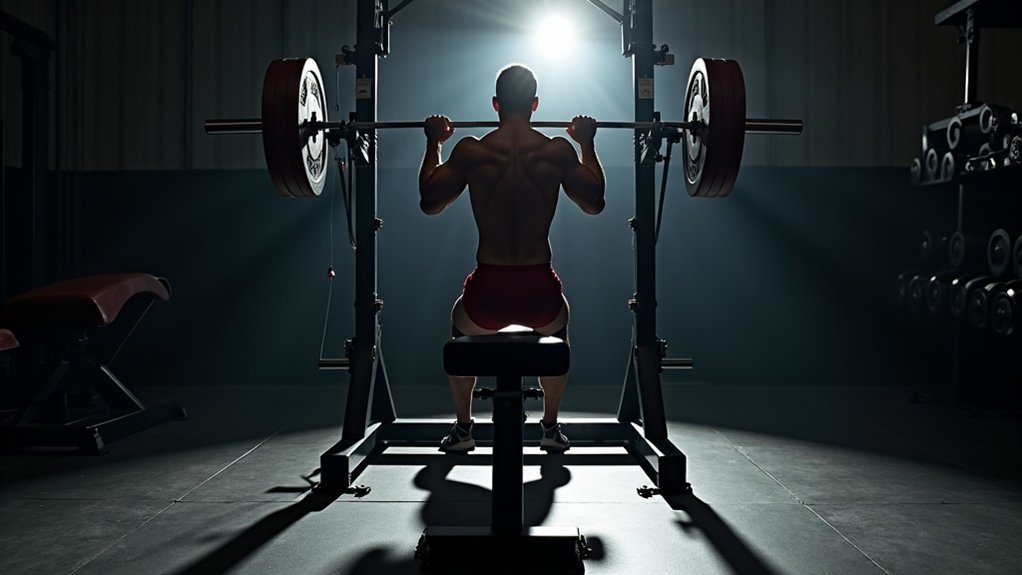
To bench press alone safely in your home gym, utilize a power rack with adjustable safety bars set just below chest level. This setup ensures that the safeties will catch the bar if you struggle with a lift, allowing for a safer workout experience. Avoid using weight collars, as they can prevent plates from sliding off, which is essential for safely rolling the bar away from you in case of an emergency. Always test your setup with an empty bar first and practice the rolling technique with lighter weights to build confidence. Keep exploring for more tips on creating a safe and effective home workout environment!
Key Takeaways
- Set safety pins just below chest level to effectively catch the bar during failed lifts, ensuring a safe workout environment at home.
- Test your setup with an empty bar to confirm that the safety pin height is correct before adding any weights, promoting safety and confidence.
- Avoid using collars on the barbell to allow plates to slide off if a lift fails, which can facilitate a safe escape and prevent injury.
- Practice the roll of shame technique with lighter weights to familiarize yourself with safely escaping a failed lift, enhancing your home gym experience.
- Document safety height settings in a training log for consistency and quick adjustments in future workouts, helping you stay organized and focused on your fitness goals.
Equipment Needed for Safe Bench Pressing
When you’re bench pressing alone in your home gym, having the right equipment is essential for your safety and success.
A power rack with adjustable safety bars is crucial, as it provides support in case a lift goes wrong. Ensure your equipment includes built-in safety pins or crash bars to catch the barbell, preventing injury during unexpected failures.
Set the safety pins at the correct height to allow for proper lifting while being low enough to catch the bar if needed. It’s advisable to avoid using weight clips on the barbell, as they can cause plates to slide off, increasing the risk of being pinned.
Regularly test your setup for accuracy to ensure a safe and effective workout.
Setting Up Your Safeties
Setting up your safeties is a crucial step in ensuring a secure bench press experience, especially when you’re exercising alone at home.
Position your safety pins in a power rack or squat stand just below your chest level. This allows them to catch the barbell if you can’t complete a rep, while still giving you the freedom to lift without interference.
Ensure that your safeties are set at the correct height to allow for a full range of motion, while still providing adequate support.
It’s also a good idea to practice rolling the bar off your chest towards your hips as an added precaution.
For convenience, record the height of the safeties you set, so you can make quick adjustments in future workouts.
This way, you can focus on your fitness journey with confidence and safety.
Testing Your Setup
Before you start your home workout routine, it’s essential to verify your safety pin height with an empty bar to ensure they’ll catch the bar if you fail.
Simulate a failed rep by lowering the bar to check if the safeties work effectively, and remember to practice the roll of shame with lighter weights.
Don’t forget to record your setup adjustments in your training log for consistency in your future home workouts.
Verify Safety Pin Height
To ensure a safe and effective bench pressing experience at home, it’s essential to verify the height of your safety pins.
Begin by performing test reps with an empty bar on your squat rack. Lower the bar to confirm that it rests securely on the safety pins, ensuring they catch it without obstructing your lift.
Additionally, while lying on the bench, you can roll the bar towards your face to evaluate the effectiveness of the safety setup.
Make sure to record the safety pin height in your training log for consistency, and consider marking your squat rack with a permanent marker to streamline your preparation.
This will help reduce the risk of injury during your home workouts, allowing you to focus on achieving your fitness goals safely.
Simulate Failed Rep
While you might feel confident in your bench pressing setup, simulating a failed rep is crucial for maintaining safety during solo workouts at home.
Begin with an empty bar and lower it slowly toward your chest, maintaining control until you reach the point of failure. Ensure that your safety catches are set to secure the bar just above your chest.
If the safeties aren’t engaged, practice rolling the bar toward your stomach and hips to exit safely. It’s a good idea to document the height of the safeties in your training log to maintain consistency and prevent any mishaps in future sessions.
Record Setup Adjustments
Once you’ve set up your home gym bench and safety pins, it’s crucial to test your setup to ensure everything is ready for a safe lifting experience.
Begin by performing test reps with an empty bar, making sure the safety pins are positioned at the appropriate height. Simulate a failed rep by lowering the bar to verify that the pins catch it effectively without hindering your movement.
Roll the bar towards your face to check the effectiveness of the safety features. Record the safety heights in your training log for future sessions, and use a permanent marker to mark your rack.
This will help streamline your setup and minimize errors during your barbell training at home, promoting safety and efficiency in your fitness journey.
Recording Safety Heights
When setting up your home gym, recording safety heights for your bench press is crucial for creating a secure training environment.
Begin by testing the safety height with an empty bar to ensure it won’t interfere with your lift. To verify its effectiveness, simulate a failed rep by rolling the bar toward your face during the testing phase.
Test the safety height with an empty bar, simulating a failed rep to ensure your training is secure and effective.
Use a permanent marker to clearly mark the ideal safety heights on the rack, allowing for quick and easy adjustments in the future.
Remember to regularly reassess and record your safety heights as your strength develops. This practice will give you the confidence to train independently, knowing that you’re safe and well-prepared for your workouts at home.
The Importance of Not Using Collars
Using collars during bench pressing might seem like a good idea for stability, but it can actually create significant risks when you’re lifting alone at home.
Not using collars allows plates to slide off the bar if you fail a lift, reducing the chance of being pinned down. This setup lets you safely roll the bar down your body, providing a clear escape route.
Techniques for Safely Rolling the Bar
Not relying on collars opens up the possibility of safely managing the barbell at home in case of a failed lift.
The “Roll of Shame” technique is essential here; if you can’t complete a rep, lower the bar to your stomach and roll it to your hips. This allows you to sit up and safely remove the bar, making it a great option for home gym enthusiasts.
The “Roll of Shame” is a vital technique for safely managing failed lifts at home.
Always set safety pins just below the lowest point of your lift to catch the bar if you need to bail, ensuring a safe workout environment.
Remember to unload weights carefully by removing plates from the side to prevent flipping, which is especially important in a home gym setting.
Regularly test the safeties before each session for maximum safety and peace of mind as you work toward your fitness goals at home.
Final Safety Tips for Solo Lifters
While bench pressing alone can be empowering, it’s essential to prioritize safety to prevent accidents, especially when working out at home.
Always set your safety pins just below chest level to catch the bar in case of a failed lift. Before adding weight, test your setup with an empty bar to ensure everything is functioning properly.
When lifting without a spotter, it’s best to avoid using weight clips; they can impede quick bailouts. Familiarize yourself with the roll of shame technique using lighter weights to enhance your safety.
Finally, keep a training log to track the height settings of your safeties—this practice will help you maintain consistent and safe setups for your future home workouts.
Stay safe and lift smart!


