To anchor a climbing rope indoors for a home gym setup, select a secure anchor point that can support at least double the expected load. Ensure the anchor is strong and stable, utilizing fixed anchors like bolts or eye bolts if available. Use a figure 8 on a bight knot to connect the rope to your harness, making sure all carabiners are securely locked. It’s essential to perform safety checks on your gear and environment before and after your workout sessions. There’s much to learn about this setup, including different knot options and techniques that can enhance your training experience at home.
Key Takeaways
- Choose a sturdy anchor point in your home gym that can withstand significant weight and is structurally sound for indoor use.
- Utilize a Personal Anchor System (PAS) securely attached to your harness for added safety during workouts.
- Connect your climbing rope using a figure 8 on a bight knot to ensure a strong and reliable link.
- Make sure all carabiners are locked and conduct a thorough visual inspection of your setup before starting your exercise routine.
- Keep your workout area free of any obstacles or hazards to ensure a safe environment while exercising at home.
Selecting a Secure Anchor Point
When selecting a secure anchor point for your home gym equipment, it’s crucial to ensure that the anchor can support at least double the expected load, which typically means a minimum of 20 kN (about 4,500 lbs).
Inspect the anchor for structural integrity, making sure there’s no wear, corrosion, or looseness. Opt for fixed anchors like bolts or eye bolts, installed according to manufacturer specifications and local safety regulations.
If you’re using a sling or runner, ensure that it’s rated for gym use and properly secured. Always use locking carabiners to attach your equipment, adding an extra layer of safety against accidental detachment.
Prioritize safety to create a reliable and effective workout environment at home.
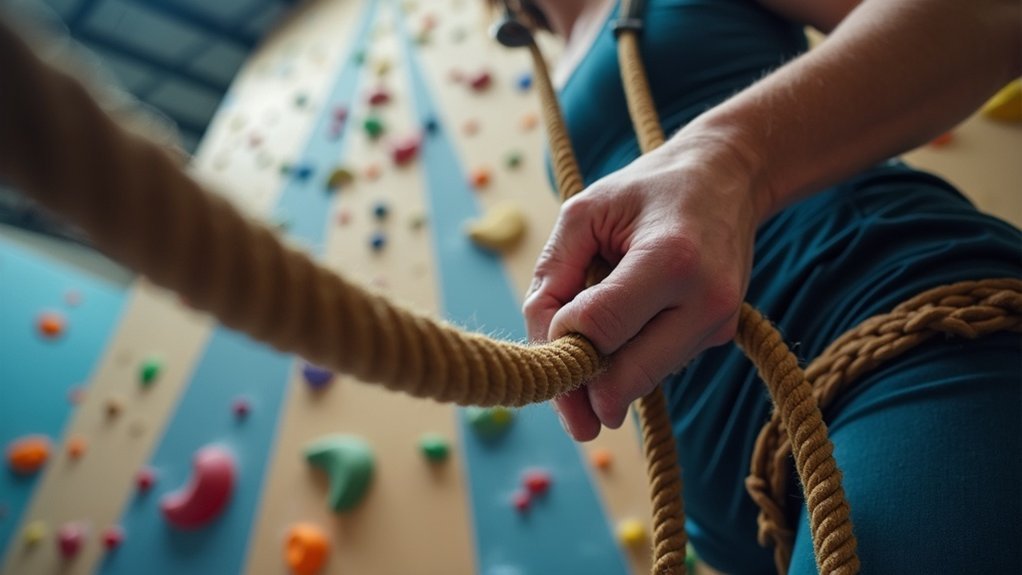
Attaching the Climbing Rope
Attaching the climbing rope correctly is essential for your safety and performance, especially if you’re incorporating climbing into your home gym workouts.
Start by using a figure 8 on a bight knot to create a secure harness connection, and always visually inspect it before use. Connect the climbing rope to the anchor point using locking carabiners to prevent accidental unclipping while you climb.
Begin with a figure 8 on a bight knot for a secure connection, and always inspect it visually before use.
It’s vital to maintain a single master point for the rope attachment, simplifying belaying and minimizing the risk of mismanagement. If you’re using a quad anchor system, clip the rope into the power point formed by opposing locking carabiners for added security.
Regularly check all attachment points for wear to ensure your home gym remains a safe and effective environment for staying healthy and fit.
Knots for Direct Attachment
To guarantee a secure connection when using your home gym equipment, it’s crucial to choose the right knots for direct attachment. The bowline knot is a top choice, as it creates a fixed loop that won’t slip, making it ideal for securing resistance bands or cables.
For two loops in an anchor setup, consider a bowline on a bight; it allows for adjustable equalization without the risk of pull-through, perfect for stability during workouts. The figure 8 on a bight provides a secure connection to your equipment and is easy to inspect for safety.
Additionally, using a constrictor knot ensures a tight grip, minimizing slippage during intense exercises. Always pair your knots with locking carabiners for added safety when setting up your home gym.
Safety Checks and Protocols
Before you begin your workout at home, it’s essential to conduct thorough pre-session equipment checks.
Inspect your gear for wear and ensure that all connections are secure and properly adjusted.
After setting everything up, perform post-workout checks to confirm that your equipment is stable and free of any hazards.
Pre-Anchor Setup Inspections
While preparing for your home workout session, it’s crucial to conduct thorough equipment inspections to guarantee safety and effectiveness.
Start by checking all your gym equipment for wear, rust, or looseness, ensuring everything is securely fastened and in good working condition.
Verify that your weights or resistance bands are appropriate for your fitness level and free from visible damage like cracks or frays.
Confirm your setup follows the manufacturer’s guidelines, using proper techniques and safety features.
Make sure your exercise area is clear of hazards, such as loose items or obstructions that could interfere with your workout routine.
Finally, ensure your personal fitness goals are defined, and your workout plan is tailored to meet them effectively.
Post-Anchor Connection Checks
After ensuring your home gym setup is secure and ready for use, it’s time to focus on the post-setup equipment checks.
Begin with a thorough visual inspection of all components, including weights, resistance bands, and exercise machines. Look for any signs of wear, rust, or damage. Make sure all weights are securely fastened and that mechanisms on machines function properly to prevent accidents during your workout.
Verify that your resistance bands are free from tears and securely attached. Confirm that your workout space is organized to allow for safe movement and exercise.
Finally, establish a routine with your workout partner or accountability buddy to confirm all safety checks are complete before starting your home workout session.
Setting Up the Anchor
To set up a reliable anchor for your home gym equipment, start by choosing a suitable anchor point that’s both structurally sound and designed for fitness use, such as a heavy-duty wall mount or ceiling fixture.
Use a Personal Anchor System (PAS) girth hitched to your harness or a sturdy attachment point to secure yourself while setting up.
Employ a cordelette, typically around 25 feet of 7mm, to create a stable anchor by doubling it for four equal-length strands attached to the anchor points.
Clip locking carabiners into the loops, ensuring they’re secure.
Finally, double-check that all carabiners are locked and the system is tensioned correctly to ensure safety during your workout.
Lowering Techniques
How can you ensure a safe and effective workout when using home gym equipment? Start by confirming that all equipment is securely set up and stable.
Here are key techniques to follow:
- Communicate with any workout partners to ensure everyone is ready before beginning your routine.
- Maintain a steady and controlled pace during exercises to avoid sudden strains or injuries.
- After your workout, double-check that all equipment is properly stored to prevent accidents.
Once your session is complete, tidy up your workout space and neatly organize your gear. This guarantees a clean and efficient setup, ready for your next home fitness adventure.
Cleaning the Anchor
Before you start organizing your home gym equipment, ensure you have a safe workout area.
Secure any loose items and make sure your space is well-lit for added safety.
Once you’ve tidied up your gym, make sure to store your equipment neatly to prepare for your next workout session.
Prioritize keeping your space clutter-free to maintain motivation and ensure effective exercise routines.
Final Climb Preparation
As you prepare for your final workout session at home, make sure your exercise equipment is set up securely to prevent any accidents.
Follow these steps to ensure your safety:
- Check that all weights and attachments on your home gym are securely fastened.
- Ensure your workout mat is positioned properly to provide stability during exercises.
- Inform any household members to avoid the workout space while you’re exercising to maintain focus and safety.
Once you finish your session, perform a final check of all equipment to ensure everything is in place before storing it away.
Finally, tidy up your workout area to keep it organized for your next session.
Quickdraw Attachment Process
Cleaning your home gym equipment is an essential step in your workout routine, ensuring your space is safe and ready for your next exercise session. To start, make sure all equipment is securely in place. If you’re using weights, ensure they are properly racked. Instruct anyone nearby to maintain a safe distance while you clean. Always check that the equipment is in good condition and free from any obstructions. After cleaning, organize your gear neatly, preparing for your next workout or exercise routine.
| Step | Action | Notes |
|---|---|---|
| Secure Equipment | Ensure it’s in place | Safety first |
| Instruct Others | Maintain a safe distance | Avoid accidents |
| Check Condition | Inspect for any damage | Prevent injuries |
| Organize Gear | Rack weights and tools | Ready for next workout |
| Prepare Space | Clear area for movement | Optimize workout flow |
Gear Rack Organization
Once you’ve confirmed your home gym equipment is secure and ready for use, organizing your workout space becomes a priority, especially when it comes to maintaining your exercise setup.
Years ago, I learned that proper organization saves time and effort. Here’s how to keep your home gym tidy:
- Group similar items like dumbbells, resistance bands, and yoga mats for easy access.
- Always secure equipment like weights and kettlebells to prevent accidents during workouts.
- Systematically put away each piece of equipment, racking them in the order you used them for efficiency.
After your workout, inspect all equipment for wear before storing to ensure safety and longevity.


