To verify slab thickness before anchoring your home gym equipment, start by reviewing your construction documents for specifications related to the flooring. If those aren’t available, drill a small hole and use a hooked wire to measure the depth accurately. You might also consider non-destructive testing methods like impact-echo for precise evaluation without damaging your space. Inspect for any previous repairs and perform moisture tests to ensure the slab’s performance is suitable for supporting your gym setup. Accurate measurement is vital for safety and stability, especially when anchoring heavy equipment like weight racks or benches. Once you’ve confirmed the slab’s thickness, learn about best practices for preparing the surface to optimize your home workout environment.
Key Takeaways
- Review your home gym’s construction documents to gather initial slab thickness information, and verify it with actual measurements before anchoring equipment.
- Drill a small hole with a carbide bit and use a hooked wire to accurately measure the slab’s thickness, ensuring your gym equipment is securely anchored.
- Consider using non-destructive testing methods, such as impact-echo or ground-penetrating radar, for precise thickness evaluations without damaging your slab, maintaining the integrity of your home gym.
- Inspect the slab surface for any previous repairs that may impact its load-bearing capacity, and check that moisture levels are appropriate for safe anchoring.
- Document all measurements and findings to ensure compliance with safety regulations, helping you create a safe and effective workout environment in your home gym.
Importance of Knowing Slab Thickness
Understanding slab thickness is crucial for home gym setups, as it ensures the stability of your equipment and the safety of your workouts.
Accurately determining the thickness of your concrete slab is essential for its load-bearing capacity, especially when placing heavy gym equipment like weight benches, squat racks, or treadmills. Insufficient thickness can lead to cracking and potential failure under the stress of regular use.
Moreover, knowing the correct slab thickness helps in moisture prevention, allowing for the proper installation of flooring systems that protect both your equipment and your home.
This knowledge also facilitates effective planning and design for any future renovations, ensuring that your home gym remains compatible with the existing structure.
Therefore, it’s vital to check that your concrete slab meets the necessary thickness standards for a safe and effective workout environment.
Common Methods to Measure Slab Thickness
When determining the thickness of flooring in your home gym, several reliable methods are at your disposal, each suitable for different circumstances.
Checking the construction documents or specifications provides the most accurate dimensions for new installations of gym flooring. If those documents aren’t available, you can drill a small hole and use a hooked wire to effectively measure the depth of the flooring material.
For accurate flooring thickness, refer to construction documents or use a hooked wire for direct measurement if they’re unavailable.
Non-destructive testing (NDT) methods like impact-echo and ground-penetrating radar allow for precise measurements without damaging the floor, ensuring that your workout area remains in top condition.
For high precision, X-ray machines can determine thickness, although this requires specialized expertise and may not be practical for home use.
Finally, observing exposed edges might offer a quick estimate of thickness, but it’s wise to confirm accuracy with direct measurement techniques to guarantee structural integrity during your home gym setup and ensure a safe workout environment.
Tools Required for Accurate Measurement
To accurately measure the thickness of gym flooring or mats, you’ll need a combination of essential tools and advanced equipment.
Start with basic tools like a measuring tape and caliper for initial assessments, while considering non-destructive testing methods for more precise evaluations if you’re working with specialized equipment.
If maximum accuracy is required, professional-grade thickness gauges can provide detailed measurements, though they may require some technical knowledge to operate effectively.
Essential Measurement Tools
Accurate measurement of home gym space is crucial for ensuring you have the right equipment for your workouts. A 1/4-inch carbide drill bit can be useful for marking precise locations in your space.
To gauge the height of your ceiling for exercises like overhead presses, use a piece of wire with a bent hook, marking it at the desired height. A spud bar can help you identify different areas in your gym, ensuring that you have enough clearance and space for various activities.
For the most precise assessment of your workout area, consider using a laser level to ensure everything is aligned correctly.
Finally, if you’re adding moisture-sensitive equipment like wood flooring or mats, ensure they’re placed according to industry standards for moisture testing, which is essential for maintaining a healthy workout environment.
Advanced Testing Equipment
Advanced home gym equipment plays a crucial role in helping individuals achieve their fitness goals and maintain a healthy lifestyle. High-quality resistance bands allow for effective muscle training without the need for bulky weights, making them ideal for home workouts.
Adjustable dumbbells provide versatility, enabling users to easily change weights for various exercises. For cardio, compact treadmills and stationary bikes offer efficient options to get the heart rate up while saving space.
Additionally, stability balls and balance boards enhance core strength and stability, promoting overall fitness. With advanced home gym technology, such as smart fitness mirrors and app-connected equipment, users can receive real-time feedback and personalized workout plans, making their home workouts more engaging and effective.
Step-by-Step Guide to Measuring Thickness
To measure the thickness of home gym flooring accurately, you’ll need specific tools and techniques.
Start by gathering a drill for creating a small test hole and a hooked wire for probing depth.
Utilizing both drilling and non-destructive testing methods will ensure reliable measurements across different areas of your flooring, which is essential for setting up your home gym safely and effectively.
Tools Needed for Measurement
Measuring the thickness of your home gym flooring or slab can be important for ensuring safety and stability for your equipment. To achieve accurate measurements, you’ll need specific tools.
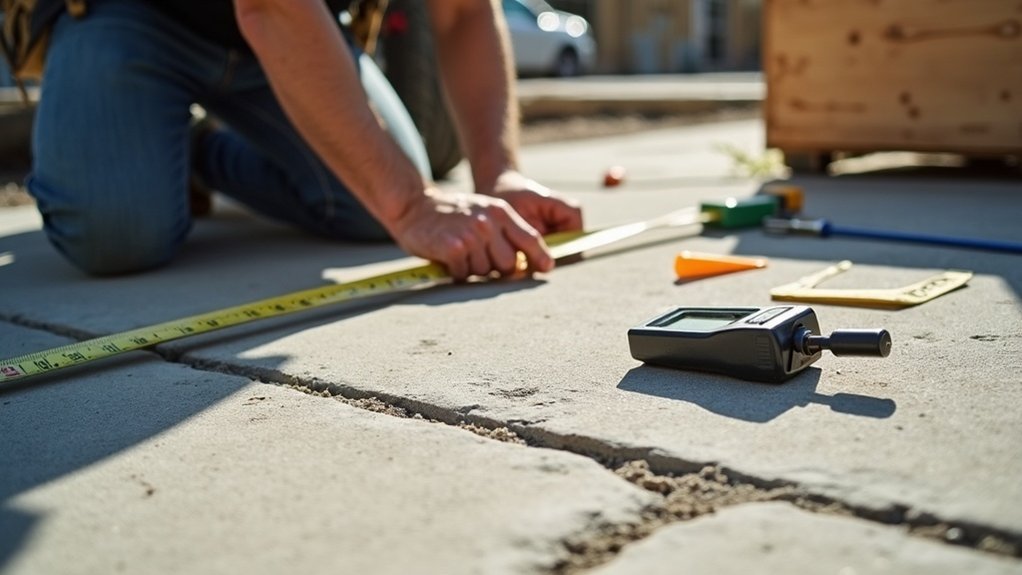
Start with a drill fitted with a 1/4-inch carbide bit to create a small hole; mark the bit at the exit point to gauge thickness effectively. Next, use a wire probe with a hooked end to reach the bottom of the slab; measure the distance from the top edge to the mark for precise readings.
A spud bar can also help assess thickness through sound; a solid thump indicates consistent depth, which is crucial for stability during workouts. For non-invasive options, consider ultrasonic pulse-echo or ground-penetrating radar to check thickness without damaging the surface.
Always ensure the area is clean to avoid inaccuracies during measurements, as a well-maintained workout space contributes to your health and fitness journey.
Drilling and Probing Techniques
Once you’ve gathered the necessary tools for measurement, you’re ready to implement drilling and probing techniques to verify slab thickness in your home gym setup.
Follow these steps for effective measurement:
- Drill a small, vertical hole through the slab using a 1/4-inch carbide bit, marking the bit at the bottom edge to ensure precise depth.
- Insert a hooked wire probe into the hole until it touches the bottom, marking the wire at the top edge to accurately gauge thickness.
- Measure the distance between the hook and the mark to determine thickness in inches, ensuring your gym equipment is set on a stable foundation.
- Use a spud bar to thump the surface, listening for sound variations that indicate solid or hollow areas, which can affect the stability of your gym flooring.
For enhanced accuracy and peace of mind regarding your home gym’s structural integrity, consider professional NDT methods.
This will help you maintain a safe and effective workout environment.
Consulting Professionals for Verification
Consulting professionals for slab thickness verification is crucial when setting up your home gym equipment, ensuring both safety and compliance with building standards.
Experts employ non-destructive testing (NDT) methods such as impact-echo and ground-penetrating radar to quickly and effectively assess slab thickness without causing damage.
Experts use non-destructive testing methods like impact-echo and ground-penetrating radar for safe and efficient slab thickness assessment.
By hiring a consultant, you gain access to precise measurements and insights into structural integrity, which is vital for choosing the right gym equipment that can handle the load and intensity of your workouts.
Professional evaluations can also reveal potential issues that might arise when installing heavy equipment or making structural modifications, ultimately saving you time and resources by preventing costly mistakes related to incorrect assumptions about slab thickness.
With the right support, you can create a safe and effective home workout space tailored to your fitness goals.
Impact of Slab Thickness on Structural Integrity
When setting up a home gym, the thickness of your flooring or slab is an important factor that can significantly impact the durability and safety of your exercise space.
Understanding the influence of slab thickness is essential for creating a stable and long-lasting environment for your workouts. Consider the following:
- A minimum recommended thickness of 4 inches is generally advisable; 6 inches is ideal for accommodating heavier gym equipment like weight racks and benches.
- Thicker flooring can better absorb impacts and vibrations, enhancing the overall longevity of your workout area.
- Insufficient thickness may result in cracks or damage under heavy loads, compromising your exercise routine and safety.
- Adhering to recommended guidelines ensures that your flooring is suitable for the types of activities you plan to engage in at home.
Ensuring adequate slab thickness, along with proper flooring materials, significantly enhances the strength and stability of your home gym, allowing you to focus on your fitness goals with confidence.
Documenting Measurements for Compliance
Accurate documentation of home gym equipment measurements is essential for ensuring compliance with safety regulations and user guidelines. Use a consistent measurement method, such as using a tape measure or digital scale, to maintain uniformity.
Mark the dimensions clearly for precise records. Record each equipment’s location and specifications to create a thorough inventory of your home gym setup. Include relevant product manuals that specify expected dimensions and weight limits to facilitate comparison against your findings.
Maintain a log of any discrepancies, detailing actions taken to rectify them, ensuring adherence to safety standards and promoting a healthy workout environment throughout your fitness journey.
Best Practices for Preparing the Slab Surface
To ensure optimal performance of home gym equipment anchors, it’s essential to properly prepare the slab surface where they’ll be installed.
Follow these best practices to achieve maximum adhesion and structural integrity:
- Start by thoroughly cleaning the surface to eliminate any dust or debris, which can trap moisture and hinder the effectiveness of your anchors.
- Check the slab thickness by drilling a small hole and measuring with a wire probe, ensuring it can safely support your gym equipment.
- Inspect for any previous repairs or modifications to the slab that might affect its load-bearing capacity, which is crucial for the safety of your home gym setup.
- Perform a moisture test to determine humidity levels, as excessive moisture can significantly compromise the performance of your anchors and the stability of your equipment.


