Stall mats can be a great solution for leveling out minor imperfections in your garage floor, creating a solid, cushioned surface ideal for your home workouts or heavy gym equipment. With their ¾ inch thickness, these mats effectively absorb minor unevenness and reduce joint impact during exercise, making them a smart choice for anyone looking to stay fit at home. Before you start, assess your floor’s condition, and for more significant slopes, consider using self-leveling compounds to ensure a smooth surface. For additional tips on installation and maintenance, we provide valuable guidance to help you keep your home gym setup functional and safe for all your fitness needs.
Key Takeaways
- Stall mats can absorb minor imperfections and unevenness in garage floors due to their ¾ inch thickness, making them a suitable choice for home gym setups.
- For significant slopes in your garage, it’s best to use self-leveling compounds in conjunction with stall mats to achieve a smoother surface for your workout area.
- Grinding down high spots can create a consistent base, ensuring that your stall mats lay flat and provide a stable foundation for your home gym equipment.
- Proper installation techniques, including securing the mats, can prevent shifting and enhance stability on uneven floors, allowing for a safer workout environment.
- While stall mats are effective at providing cushioning and a stable surface for exercise, they do not level floors on their own, so additional measures may be necessary for optimal results.
Understanding the Benefits of Stall Mats
When enhancing your home gym, stall mats present numerous advantages that make them an excellent choice for flooring.
Constructed from super dense rubber, these ¾ inch thick mats effectively address minor unevenness in your garage or workout area. They offer outstanding cushioning and shock absorption, which helps minimize impact on your joints during exercise sessions.
The non-porous surface is resistant to moisture, making cleaning and maintaining hygiene a breeze. Designed to endure heavy equipment and high foot traffic, stall mats boast a longer lifespan compared to many other flooring options.
Priced at around $1.66 per square foot, they provide a budget-friendly solution for creating a stable and functional workout environment, perfect for both men and women dedicated to staying healthy through home exercise.
Preparing Your Garage Floor for Stall Mats
Before you install stall mats in your home gym, it’s important to assess the condition of your garage floor for any uneven spots.
Use a long straight 2×4 to check for levelness and identify areas that may need grinding or filling.
This preparation is crucial for creating a stable base that will effectively support your mats, ensuring a safe and effective workout environment for your fitness journey.
Assessing Floor Condition
To ensure a successful installation of stall mats in your home gym, it’s crucial to thoroughly assess the condition of your floor.
Begin by checking for any uneven surfaces; a long straight 2×4 can help you measure high and low spots effectively. Minor imperfections can typically be managed with thicker rubber mats, around ¾ inch, which provide excellent cushioning for your workouts.
However, if you encounter significant slopes or major uneven areas, it may be wise to apply a self-leveling compound like Schönox AP for a smoother, more stable surface. Additionally, grinding down high spots can also help create an even base.
Finally, when laying down the mats, ensure they’re closely fitted together to prevent gaps and enhance stability, using fillers or caulk if needed. This will create a safe and effective workout environment for your home gym.
Leveling Techniques Overview
Having assessed the condition of your garage floor, it’s time to explore effective leveling techniques that will set the stage for your home gym.
Start by measuring the floor’s slope with a long straight 2×4 to identify any significant height differences. Use a self-leveling compound, such as Schönox AP, applying a primer first to fill in low areas and create a smooth surface for your workout area.
For any high spots, grind down the concrete to ensure a consistent base. If minor unevenness remains, consider opting for thicker stall mats, like ¾ inch horse mats, which offer added cushioning for your exercises.
Finally, secure the mats with anchors to prevent movement during your workouts, ensuring a safe and effective exercise environment on your garage floor.
Preparing for Installation
As you prepare to install stall mats in your home gym, it’s crucial to ensure the floor is properly prepped for optimal performance and longevity.
Begin by assessing your garage floor for any unevenness; utilize a long straight 2×4 to identify any high or low spots. Grind down any elevated areas and consider applying a self-leveling compound like Schönox AP for any low spots to create a smooth, even surface.
Opt for ¾ inch thick stall mats to help absorb minor unevenness and provide a comfortable workout environment.
Finally, secure the mats to the concrete foundation with Tapcon anchors to prevent sliding, ensuring a safe and durable flooring setup for your active lifestyle.
Securing Stall Mats to Prevent Movement
To ensure your stall mats remain securely in place in your home gym, there are several effective methods you can use, such as concrete anchors or framing with boards.
Installing anchors requires careful drilling to achieve a snug fit, while keeping your mats aligned is crucial to prevent any shifting during your workouts.
Let’s delve into these securing techniques and the steps involved to enhance the stability of your workout space, making it safer and more effective for both men and women committed to staying healthy through exercising at home.
Securing Methods Overview
While securing stall mats is crucial for ensuring a safe and organized home gym environment, there are several effective methods to prevent them from shifting during workouts. Here’s an overview of common securing methods tailored for your home gym:
| Method | Description | Best Use |
|---|---|---|
| Tapcon Concrete Anchors | Drill holes for ¼ Tapcon anchors with metal sleeves for a solid hold. | Edges of workout space |
| Runner Boards | Frame your mats with boards to enhance stability and prevent slipping. | General mat placement |
| Commercial Urethane Adhesive | Apply adhesive for a permanent solution, ideal for long-term setups. | Long-term installation |
| Heavy Equipment Stabilization | Utilize heavy gym equipment on mats to minimize movement during workouts. | Dynamic exercise areas |
These methods will help you achieve a secure and effective workout space, allowing you to focus on your fitness goals with confidence.
Anchor Installation Steps
Securing your stall mats is essential for a safe and effective home workout routine.
Installing anchors not only prevents unwanted movement but also enhances the overall stability of your workout area.
Follow these simple anchor installation steps to keep your home gym in top shape:
- Begin by marking the anchor locations on the mats, then drill through them into the concrete floor.
- Utilize ¼ Tapcon concrete anchors with metal sleeves positioned at the outer edges of the mats.
- Use a 3/8 drill bit to create larger holes in the mats to ensure a snug fit for the anchors.
- Carefully tighten the anchor screws by hand with a Philips head driver to prevent any stripping.
- For extra stability, consider framing the area with 1-inch runner boards or applying commercial urethane flooring adhesive.
Maintaining Mat Alignment
Ensuring your stall mats remain aligned during home workouts is crucial for both safety and effectiveness. To keep them securely in place, consider using ¼ Tapcon concrete anchors on the outer edges, while leaving the mats adjacent to walls free for easy access. Before you start drilling, accurately mark the concrete to avoid any misalignment. After securing the mats, always check the alignment with a level; this step ensures they are flush and even, creating a safe environment for your home gym. Properly secured mats also make cleaning easier, minimizing debris buildup.
| Step | Description |
|---|---|
| Drill Holes | Mark and drill through mats into the concrete floor. |
| Insert Anchors | Place Tapcon anchors into the drilled holes. |
| Secure Mats | Tighten anchors to firmly hold the mats in place. |
| Check Alignment | Use a level to ensure everything is even. |
| Maintain Cleanliness | Regularly clean your mats without worrying about shifting. |
Installation Steps for Stall Mats
Installing stall mats on an uneven garage floor for your home gym can be a straightforward process if you follow the right steps. Here’s how to create a solid foundation for your home workout space:
- Gather tools: drill, measuring tape, and anchors.
- Align mats to ensure they fit well and mark anchor locations for stability.
- Drill through the mats to mark the concrete floor so that your mats stay securely in place.
- Secure the mats using ¼ Tapcon concrete anchors and metal sleeves, ensuring they won’t shift during your workouts.
- Trim mats as needed to avoid gaps and maintain a clean look, using fillers or tape for added stability to keep your workout area safe and effective.
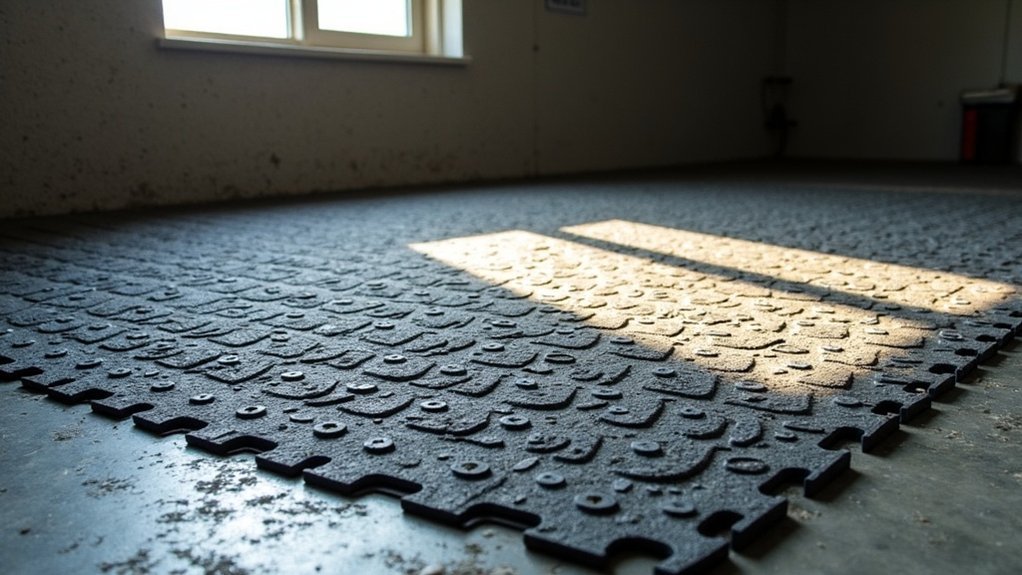
Customizing Stall Mats for a Perfect Fit
Once you’ve successfully installed your stall mats, customizing them for a perfect fit can greatly enhance the look and functionality of your home gym.
Begin by measuring accurately and clearly marking cut lines on your rubber stall mats. Use a sharp utility knife or jigsaw to make precise cuts, particularly around edges and corners, to ensure a seamless appearance.
After cutting, fit the mats snugly together with a rubber mallet to minimize gaps and reduce tripping hazards—important for safe workouts. If any gaps remain, fill them with black caulk or tape for added stability and aesthetic appeal.
Customizing your stall mats not only transforms your workout space but also contributes to a more effective and enjoyable exercise environment at home.
Addressing Slopes in Your Garage Gym
Addressing slopes in your garage gym is crucial for ensuring a safe and effective workout space for both men and women.
Properly addressing slopes in your garage gym is essential for creating a safe and effective workout environment for everyone.
Here are some practical steps to consider when using stall mats on uneven surfaces:
- Use ¾ inch thick stall mats for added cushioning and support.
- Opt for thicker mats to compensate for significant slopes in your garage floor.
- Consider shimming techniques or leveling compounds for drastic inclines to create a more stable surface.
- Secure mats with anchors to prevent them from shifting during your workouts, keeping you safe and focused.
- Assess and trim mats or use filler materials to enhance stability, ensuring a solid foundation for your home gym equipment.
Long-Term Maintenance of Stall Mats
While home gym mats are designed to handle intense workouts and various conditions, their long-term maintenance is crucial for keeping them in top shape.
Regular cleaning with mild soap and water helps prevent dirt buildup and unpleasant odors. Thanks to their durable rubber construction, these mats resist moisture absorption, making them hygienic and easy to care for.
Periodically inspect your mats for signs of wear or damage—addressing any issues promptly can significantly extend their lifespan.
Avoid harsh chemicals or abrasive cleaners, as they can damage the rubber surface. Proper installation and securing methods also help prevent shifting during workouts, minimizing the need for replacement or extensive upkeep.


