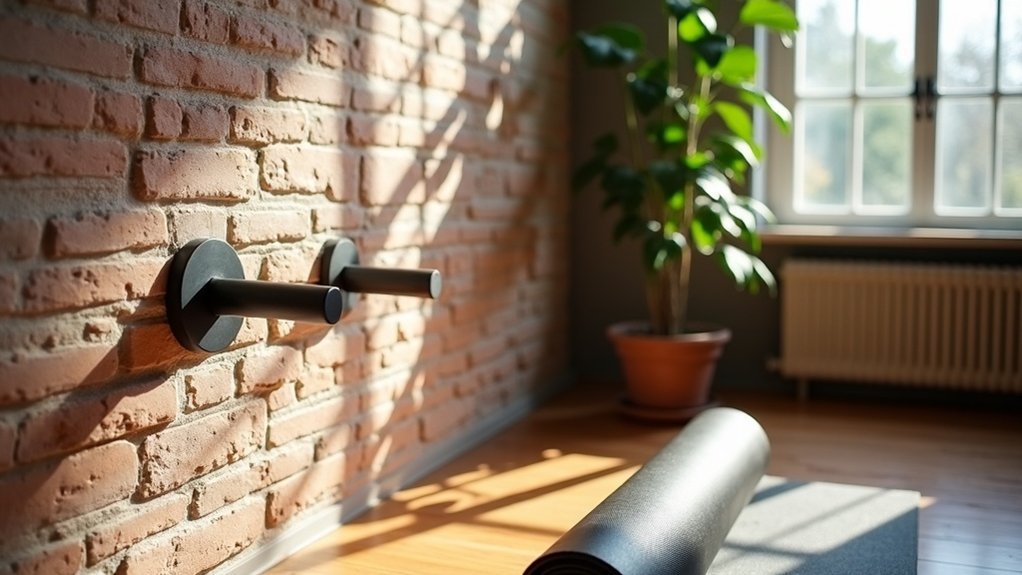
To secure a wall-mounted dip station in your home gym, start by selecting a location with solid concrete or brick walls for optimal stability. Ensure there is a vertical clearance of at least 24-30 inches and a side space of 3 feet for safe workouts. Position the dip bars 50 to 54 cm apart, and keep the surrounding area free of obstructions to allow for comfortable movement. It’s crucial to assess the wall’s strength and utilize proper installation techniques, including the use of the right masonry bits. For additional guidance on height adjustments and maintenance tips, refer to the following guidelines to enhance your home workout experience.
Key Takeaways
- Secure the dip station to a solid concrete or brick wall to ensure optimal stability and support for your home workouts.
- Make sure there is at least 24-30 inches of vertical clearance above the dip station, allowing for safe and effective exercise execution.
- Aim for a mounting height of 30 to 36 inches off the ground, ensuring a comfortable user experience for both men and women.
- Maintain a minimum distance of 12 inches from nearby walls and furniture to provide ample space for movement during your workouts.
- Regularly inspect and test all mounting hardware to guarantee safety and stability before each workout session.
Importance of Choosing the Right Location
When selecting a location for your wall-mounted dip station, it’s crucial to choose a spot with solid concrete or brick walls, as these materials provide the necessary stability and safety for your workouts.
Ensure you have enough floor space and clearance above the dip station to allow for a full range of motion, so you can maximize your exercise effectiveness.
Ensure ample floor space and overhead clearance for your dip station to maximize your exercise effectiveness.
The mounting hardware should be within the recommended width of 50 cm to 54 cm to accommodate various body sizes adequately.
Additionally, make sure the installation area is free from obstructions to promote smooth and unhindered movement during your training sessions.
This will create a safe environment, allowing you to focus on your fitness goals while preventing potential accidents or damage to your equipment.
Whether you’re a seasoned athlete or just starting your fitness journey, selecting the right location for your dip station is key to achieving success at home.
Ideal Wall Types for Mounting
Choosing the right wall type for mounting your dip station is crucial for ensuring safety and stability during your home workouts.
Ideal walls include concrete or solid brick, as they provide maximum support for weight-bearing exercises. If your home features aerated concrete walls, like Ytong, it’s important to use special wall plugs for secure installation.
Avoid mounting on drywall or thin partition walls, as these can’t handle the load and may lead to damage, compromising your workout space.
Before installation, make sure to verify that your chosen wall can support the required weight. For a hassle-free setup, follow a step-by-step guide or consult a local hardware store for expert advice on wall compatibility.
Elevate your home gym experience by ensuring a solid foundation for your equipment!
Assessing Space Requirements
When evaluating space requirements for your wall-mounted dip station, it’s essential to consider the type of wall to ensure it can support the weight and force during use.
For safe and effective workouts, you’ll need at least 24-30 inches of vertical clearance and 3 feet of side clearance to allow for unrestricted movement.
Additionally, to accommodate various body sizes and ensure comfortable usage, mount the dip bars 50 cm to 54 cm apart.
This setup is ideal for both men and women looking to enhance their home gym experience and stay fit.
Wall Type Considerations
To ensure your wall-mounted dip station is both safe and effective, it’s essential to assess the type of wall you’ll be using. The best options are concrete or solid brick walls, as they provide excellent stability for bodyweight exercises.
Steer clear of drywall or thin partition walls, as they can’t support heavy loads. If you’re considering aerated concrete, be sure to use special plugs for secure installation.
Maintain a minimum height of 7 feet for overhead clearance to allow for a full range of motion. Furthermore, make sure the dip bars are mounted 50 to 54 cm apart for optimal comfort and proper form.
Lastly, evaluate the surrounding area to avoid any obstructions during your workouts, ensuring a safe and effective exercise environment at home.
Clearance and Movement Space
After evaluating the wall type for your dip station, it’s crucial to consider the clearance and movement space around it to ensure a safe and effective workout environment.
Aim for at least 30-36 inches of vertical clearance above the station to accommodate exercises involving overhead movements, such as muscle-ups. Additionally, maintain a lateral clearance of at least 24 inches from walls or other equipment to allow for a full range of motion.
Carefully assess the surrounding area to eliminate any obstructions that could pose a risk of injury. For optimal safety and functionality, strive for a workout space of at least 6 feet by 6 feet, and install the dip station at a height that’s easily accessible for all users, making it simple to get on and off.
Prioritizing these factors will enhance your home gym experience and contribute to maintaining a healthy lifestyle.
Height Considerations for Optimal Use
When setting up your dip station at home, ensure it’s positioned between 30 to 36 inches off the ground for optimal comfort during dips and leg raises.
Additionally, maintain a clearance of 12 to 18 inches above the station to safely perform muscle-ups without risking contact with the ceiling.
It’s important to consider your height and arm length for proper alignment, which will enhance your performance and effectiveness in your workout routines.
Clearance for Muscle Ups
Ensuring adequate clearance for muscle ups is crucial for safe and effective home workouts. For optimal performance, you should have a minimum clearance of 24 to 36 inches above the dip bars.
Keep your height in mind; the dip station should be installed at a level that allows you to fully extend your arms without risk of hitting the ceiling. A recommended mounting height is approximately 30 to 36 inches from the ground, which provides a comfortable space for both men and women to use.
Before setting up your dip station, measure your jump height and consider any additional movements to ensure you have sufficient overhead space.
Additionally, always confirm that the wall can support the load and dynamics associated with muscle ups, ensuring a safe and effective home gym experience.
Proper Alignment With Height
Achieving proper alignment with height is crucial for maximizing your workout efficiency on a wall-mounted dip station, especially for those looking to enhance their home gym experience.
Install the bars at a height of 30 to 36 inches from the ground to ensure at least 18-24 inches of clearance above your head for muscle-ups and to allow a full range of motion during dips. It’s important to adjust the height based on the tallest user in your household, ensuring that everyone can benefit from the equipment.
Additionally, maintain a minimum distance of 24-30 inches from the floor to facilitate comfortable leg movement.
When installing, use a spirit level to ensure perfect horizontal alignment, which is essential for maintaining balance and safety while performing your exercises effectively.
This setup will help you and your family stay healthy and active right from the comfort of your home.
Ensuring Wall Stability and Support
To ensure optimal stability and support for your wall-mounted dip station in your home gym, it’s essential to select a wall made of concrete or solid brick. These materials are robust enough to handle the weight during your workouts.
Steer clear of aerated concrete, drywall, or thin partition walls, as they lack the necessary support. It’s crucial that the wall can accommodate your body weight along with the dip station’s load.
When installing, use a 10 mm masonry bit for concrete or brick and a 4 mm bit for wood to properly secure wall plugs.
Always utilize a spirit level to check for alignment before drilling; achieving a level installation is vital for balance and safety, helping to prevent accidents or damage during your workout sessions.
Avoiding Obstructions During Workouts
When setting up your wall-mounted dip station in your home gym, it’s crucial to ensure there’s plenty of clearance around the equipment to prevent any obstructions during your workouts. Aim for a minimum of 24 inches of space both above and around the station, and keep at least 12 inches of distance from walls or furniture. It’s also wise to position the station away from high-traffic areas to minimize the risk of collisions. Additionally, check the height to avoid interference with any overhead fixtures and ensure there’s sufficient space for exercises like leg raises.
| Clearance Requirement | Minimum Distance |
|---|---|
| Above and around | 24 inches |
| From walls/furniture | 12 inches |
| Away from high-traffic areas | N/A |
| Room for additional movements | N/A |
Installation Tips for a Secure Setup
Installing your wall-mounted dip station securely is essential for ensuring a safe and effective workout experience at home. Here are some important tips to help you achieve a sturdy installation:
- Select the Right Wall: For optimal stability, choose a concrete or solid brick wall. These materials can better support the weight and dynamic movements involved in dips.
- Drill the Right Holes: Use a 10 mm masonry bit for drilling into concrete, ensuring your holes are at least 80 mm deep. If you’re installing on wood, a 4 mm bit will suffice.
- Measure Carefully: While holding the dip station at your desired height, mark the drill holes. Ensure there’s a width of 50 cm to 54 cm between the bars for comfortable use.
- Secure Wall Plugs: Insert wall plugs flush with the wall and double-check their secure placement before mounting the dip station. It’s a good idea to test the stability by hanging from it before you start your workout.
Maintenance and Safety Checks
Regular maintenance and safety checks are crucial for ensuring your wall-mounted dip station remains safe and effective for your home workouts.
Make it a habit to frequently inspect the mounting hardware for tightness and stability to avoid any accidents during your training sessions. Keep the dip handles clean to eliminate sweat and grime, which will help you maintain a secure grip while exercising.
Be vigilant for any signs of wear and tear on the handles and mounts, and make sure to replace any damaged components promptly to keep your home gym safe.
Before each workout, perform a safety check by hanging from the dip station to test its stability.
Finally, ensure that wall plugs are properly installed and flush with the wall; this step is essential for the overall safety and stability of your dip station, allowing you to focus on your fitness goals without worry.


